Choosing the right food is essential for a great backpacking trip.
Tons of variables here:
- Personal preferences
- Diets
- Length of trip
- Cash flow
The best part?
I cover EVERY aspect on this page (updated in 2021).
Page Contents
- Backpacking Food Videos
- What do I Consider an Ideal Backpacking Food?
- Meal Planning – How Much Food to Bring?
- Backpacking Food Delivered to Your Door Step
- Backpacking Meal Suggestions – Breakfast, Lunch, & Dinner
- Hiking Snacks
- Coffee, Spice & Condiments
- Nutrition – How I Eat Healthy on the Trail
- Backpacking Food Storage
- Cold Soaking & Stoveless Backpacking
- Dehydrating Your Own Meals
- Favorite DIY Recipes
Backpacking Food Videos
Consider watching these videos before reading this guide.
See what food I bring on a 7-day backpacking trip in Utah.
A day of Stoveless Backpacking.
Be sure to check out my Paleo Backpacking Food Guide if that’s something you’re into.
What do I Consider an Ideal Backpacking Food?
If your food can hit these marks, you’re going to be CRUSHING out miles on the trail.
- Lightweight
- Calorie Dense
- Take up Little Space
- High Energy
- Nutritious
- Quick & Easy to Cook
Don’t have time to read the whole guide right now? 🙂
No worries. Let me send you a free PDF copy so you can read it when it’s most convenient for you.
Lightweight
LEAVE the canned goods at home. Try to limit carrying any foods that contain water.
Dehydrated and freeze-dried meals are your best friends.
Calorie Dense
Choosing foods with a HIGH caloric density is the easiest way to get your food’s weight down.
High-fat content is king.
Per ounce, these fatty foods are packed with the most calories.
- Olive Oil -250-
- Coconut Oil -244-
- Coconut Milk Powder -225-
- Walnuts -185-
- Hemp Seeds -180-
- Peanuts -166-
- Almonds -165-
- Dark Chocolate -158-
I ALWAYS try to pack as many of these foods as possible.
Take up Little Space
If you’re just doing an overnight trip, this isn’t too big of a concern…
Anything more than that and this becomes essential.
An example of a food that takes up a lot of space without providing many calories is a bagel.
Repackaging food can help a ton here. For example, you can pour the contents of your macaroni box into a ziplock baggie.
Provide Sustainable Energy
The food I eat on the trail affects my energy levels more than any other factor.
Hitting the right balance of fats, proteins, carbs, fiber & nutrition is key here.
Different foods affect people much differently.
Start experimenting… Take notes on the ways different foods affect your energy levels.
Quick and Easy to Cook
This gives you more time to hike & soak up the scenery.
If you plan on cooking, choose meals that just require bringing your water to a boil.
This cuts down on the amount of fuel you need to carry as well.
Nutrition
When I thru-hiked the PCT, I knew NOTHING about health. I could care less, really.
Twizzlers and candy bars accounted for over half of what I ate on & off the trail.
Luckily I was 23 and got away with it. That said. I finally smartened up a bit.
Nutrition is now one of the most important factors in most of my food choices.
Meal Planning – How Much Food to Bring?
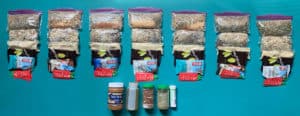
Strategically planning your food is the best way to make sure you have the right amount of food.
The amount of calories you burn is going to depend on:
- Your weight
- Weight carried
- How many miles you hike
You can easily burn through 2,000 – 4,000 calories a day.
I bring about 2,000 – 3,000 calories worth of food a day on my trips.
Don’t overstress this one. You can go days without eating and survive.
The hungrier you are when you get back to town, the better that burger usually is.
Backpacking Food Delivered to Your Door Step
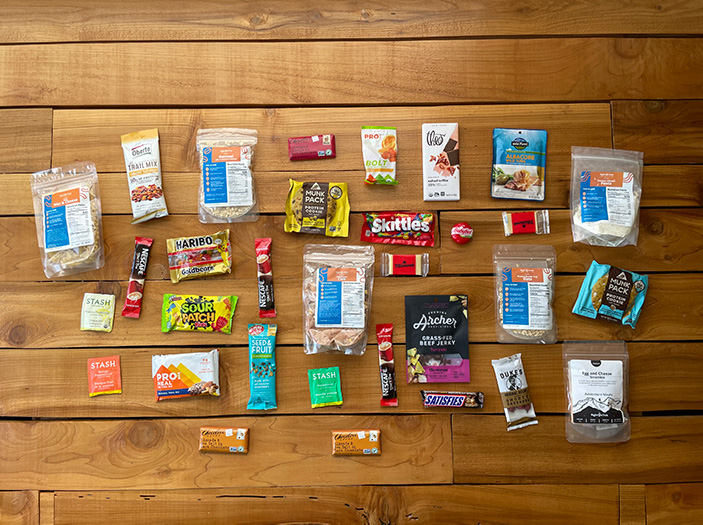
RightOnTrek provides complete food packages for backpackers. They are like the Blue Apron for hikers.
They reached out to me & I immediately thought about how many people would be stoked on this, so I gave it a shot.
All you do is decide on how many calories you want per day. And then pick out your favorite meals, snacks, and beverages.
They have a pretty awesome selection of items to choose from & the entire process only took me about 5 minutes.
That said, it looked to me like you will be paying a little more than if you went out and bought comparable food on your own.
While this may be obvious, the only other downside is that you are limited to the foods they offer.
You can check out RightOnTrek here & if you decide to try it out you can save $25 & get free shipping on your first order by using this code they hooked me up with. 1-DAY-MEAL-xC80
Backpacking Meal Suggestions – Breakfast, Lunch, & Dinner
I’m going to cover my personal favorites, budget options, & meals that are most popular amongst seasoned backpackers.
Breakfast
My personal go-to breakfast is a strong cup of coffee with a few heaping scoops of coconut milk powder.
I’ll usually pair that with a bar or some nut butter.
Instant oatmeal or granola combined with coconut or regular milk powder makes for a great breakfast as well.
Here are some other great breakfast options:
- Coffee
- Instant oatmeal
- Energy bars
- Trail mix
- Pop-Tarts
- Granola
- Powdered milk
- Powdered coconut milk
- Grits
- Nuts & seeds
- Nut butter packets
- Freeze-dried breakfast meals
Pro tip: Meltdown 1 part Coconut Oil & 2 parts nut butter in a pot at home.
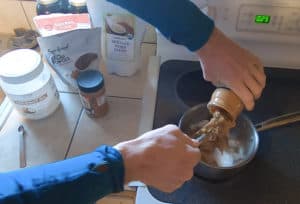
Add Hemp Seeds & Himalayan Salt to the mix & refill the empty jars.
This is a POWERHOUSE of fats, calories & nutrition.
The coconut oil gives the mix a creamier texture, and the final result tastes amazing.
Lunch
Many backpackers find it best to snack consistently throughout the day instead of making a meal for lunch.
I’m one of those people.
Pounding down a mountain house midday will surely slow you down for a bit after.
A decked out tortilla wrap is a good middle-ground for those that want something a bit more substantial than a snack.
Good stuff to put on your wraps:
- Avocado
- Tuna or chicken in foil packets
- Cream Cheese
- Nut Butters
- Jelly
- Condiments
- Hard Cheese – Extra Sharp Cheddar, Parmesan, etc
- Hard Meats – Salami, Summer Sausage, etc
Pro tip: Hard cheeses and meats can hold well for quite a while if they’re stored properly.
I’ve had cheese last 14 days in the summertime by storing it inside the center of my sleeping bag in its stuff sack throughout the day.
This provides inches of insulation—kind of the same concept of a Yeti cooler.
If you try this, make sure your cheese or meat is in its own small scent proof bag, so it doesn’t contaminate your sleeping bag with odors.
Be the first to know when I release more free in-depth guides & backpacking recipes.
Dinner
Most hikers find it best to make dinner after they arrive at camp.
I prefer a HUGE meal here.
This helps to replenish depleted calories & I sleep WAY BETTER going to bed with a full stomach.
Freeze-dried & DIY dehydrated meals are my top dinner picks.
There are also a few budget meals you can put together from items you can find at the grocery store.
Freeze-Dried Meal Pouches
I’d be lying to you if I said I didn’t enjoy a good freeze-dried meal.
Definitely your most convenient option. I find these to be nice for 2-3 day trips.
They are expensive (7-15$ each) & the packaging takes up a lot of space, for those reasons I don’t find them to be ideal on longer trips.
Most of these meals claim to be 2 servings. I find them to be closer to 1.
My personal favorite brands:
You can find these meals on Amazon, or you can pick them up at your local R.E.I.
DIY Dehydrated Meals
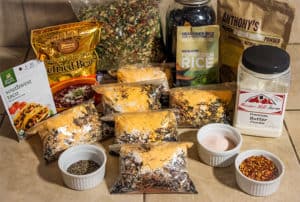
90% of my dinners are meals that I dehydrated and put together ahead of time myself.
If you backpack frequently or plan for a long trip, this could be your best bet.
I can make delicious, nutritious, organic meals for about $3 a pop.
I write about this extensively further into this guide.
Budget Grocery Store Meals
Most of these meals cost $1-4, cook easily, and be found at any decent grocery store.
They definitely lack in the nutrition department. But hey, I’d rather spend more time on the trail than more time at work.
- Ramen noodles
- Macaroni & cheese
- Velveeta style macaroni
- Knorr pasta & rice sides
- Instant mashed potatoes
- Instant soups
Most of these meals can be jazzed up with a few extra ingredients & spice.
Throw a foil packet of tuna or chicken into your rice.
Turn your ramen into a Pad Thai with some peanut butter, hot sauce, & oil.
Add some cheese & meat to your potatoes.
The sky’s the limit.
Hiking Snacks
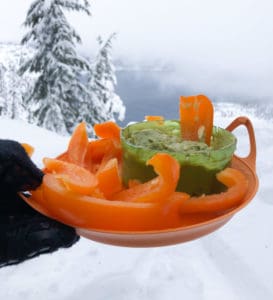
Snacking all day provides sustainable energy.
Doing so every couple of hours keeps my stomach light and hunger down.
I like to keep my snacks easily accessible, so I don’t have to repeatedly dive into my backpack.
Some of the best options:
- Chips
- Hummus
- Crackers
- Hard Cheese
- Hard Meats
- Trail Mix
- Nuts
- Nut Butters
- Dark Chocolate
- Bars
- Dried Fruit
- Jerky
- Fruit Leather
- Avocados
I find Trader Joe’s to have some of the best backpacking food options out there. I buy A LOT of my snacks there.
Coffee, Spice & Condiments
Sometimes it’s all about the little things.
A few ounces of spice and some good condiments can really step up your backcountry food game.
Backpacking Coffee
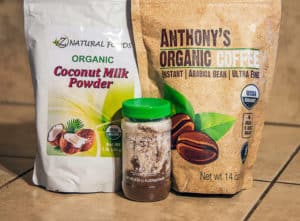
I’m going to go deep on this one.
ALL of my mornings start with a proper cup of coffee!
Most hikers tend to use instant coffee for convenience reasons.
Starbuck Via packets seem to be popular amongst hikers.
I found something that’s much better!
Taste-wise, this is by far the best instant coffee I have tried.
Plus, it’s a giant 14 oz bag at a super low price.
If you do the math, it will take 127 Starbucks Via packets to add up to 14 oz.
There are numerous health benefits to drinking organic coffee. It’s nice to take advantage of those at no extra cost.
I also add a few heaping spoonfuls of dehydrated coconut milk powder to every cup.
Not only is dehydrated coconut milk a delicious, healthy, sugar-free creamer.
It packs an insane amount of calories.
225 per ounce, making it one of the most caloric dense foods out there.
It’s also very high in fat. The combination of fats and coffee provide sustainable & prolonged energy.
My cup of coffee is the main course of my breakfast.
In the warmer parts of the year, I skip using the stove and mix my coffee cold.
Seasonings
I usually mix up some Himalayan salt, black pepper, crushed red pepper & garlic powder and put it in a small container I bring with me.
Eating ramen noodles?
Replace the msg laden CRACK PACKET with your own seasoning as a healthier alternative.
Did you know that salt is an electrolyte?
I go HEAVY on the salt. Especially in the summer when I’m sweating all day.
Condiments
A piece of cheese and salami with a little bit of hot sauce is one of my favorite snacks.
The Sriracha really makes it for me, and I always carry a small bottle or a few packets with me.
Many hikers like to stock up on fast food condiment packets AKA FREE CALORIES.
Think mustard, ketchup, relish, mayonnaise, or Taco Bell hot sauce.
Nutrition – How I Eat Healthy on the Trail
Nutrition is now one of the most important factors in most of my food choices.
There seems to be much debate about the importance of this in the hiking community…
I’m always hearing, “you burn so many calories while hiking that you don’t have to worry about nutrition.”
I call BS. I notice a HUGE difference in my energy levels, overall mood, and health depending on how nutritious my food is.
How do I eat healthy on the trail?
I try to cut down on overly processed foods. I also try to choose foods without added sugar.
I always try to pack some fresh goods for the first day or so if I can too.
Avocados, snap peas, apples, bananas, or oranges are some of my favorites. Although heavy and not very high in calories, I always find fresh food worth it.
I especially find it worth it to bring a greens powder on longer trips. The Paleovalley Organic Supergreens powder is my go-to.
You can’t put a price on good health.
This is especially important if you want to be that 80-year-old still climbing big hills.
That said. I fully believe in an 80/20 diet.
If 80+ percent of what I put into my body is nutritious, I should thrive long term.
I’ll still give in to the sour patch kids from time to time.
Backpacking Food Storage
Proper food storage is essential for the well being of wildlife.
I can proudly say that I have never once had an animal get into any of my food.
I ALWAYS store my food in a 12″ x 20″ Loksack Opsack scent proof bag.
I pair that with an Ursack Major XL Bag for maximum protection against bears and rodents.
NEVER leave food unattended (unless it’s stored away from camp properly).
NEVER leave food in your tent.
Pro tip: Every morning, separate the food that you will be eating that day from the rest of your supply.
Store that food in a smaller, easily accessible 9″ x 10″ scent proof bag.
That way, you’re not getting into your next day’s rations & repeatedly digging through your supply to find what you need.
You can also throw snacks in your hip belt pocket to easily access while hiking.
Ensure you do your research and bring a bear can if required.
I find the Bearvault Canisters to be the best overall option out there.
Cold Soaking & Stoveless Backpacking
Leave the stove & fuel behind. Be sure to check out my comprehensive Stoveless Backpacking Guide.
Hydrate your meals in a watertight resealable container.
I’m a huge fan of this and do it often in the warmer months.
Benefits of cold soaking:
- Weight savings
- Simplicity
- Easy cleanup
- Added nutritional benefits
My favorite cold soak container is an extra-large 25 oz peanut butter jar.
Dehydrating Your Own Meals
I LOVE dehydrating and making my own meals.
This makes the most sense if you are frequently backpacking throughout the year or are trying to prepare all of your food for a thru-hike.
Benefits of Dehydrated Meals:
- Cheap, $1-3 dollars a meal
- Nutritious
- Take up Little Space
- Highly Customizable
Space-saving is critical for longer trips. Good luck trying to cram 10 mountain houses in your bag.
A homemade meal in a ziplock bag takes up little space and packs nicely.
Is it time-consuming?
Not nearly as much as you might think.
I dehydrate and prep up to 60+ meals at a time.
While the dehydrator might be running for a few days, the amount of actual work I put into it is only a few hours.
Once you get over the curve of dialing in the process, it really doesn’t take long.
To extend shelf life, avoid flavor cross-contamination, and not limit your options, follow these steps.
STEP 1: Cook and dehydrate big batches of individual ingredients you like.
For example, I’ll cook and dehydrate 10 pounds of quinoa at once.
Doing one ingredient at a time ensures that everything will cook & dry out consistently.
STEP 2: Store individual cooked and dehydrated ingredients in large mason jars.
STEP 3: Store mason jars & other ingredients you want to add to your meals in a bin and keep them in a cool dark area.
STEP 4: Before your trip, break out the bin and some ziplock baggies and mix desired ingredients.
Bam! That’s it. Easy peasy.
I love this method. I can complete step 4 in about 10 minutes for a 2-week trip.
If you do everything properly, your meals will be tasting fresh 6+ months after you first did your initial dehydrating.
• I use a small scale to weigh each meal’s contents as I mix them.
• If you want to get serious about dehydrating, It’s best to buy a large-high-quality dehydrator.
• This will save you time by doing large batches at once & ensure that your food dehydrates properly.
• I use a 9 Tray Excalibur.
There’s really only a few core ingredients that make up the base of any DIY meal:
- Rice
- Beans
- Lentils
- Pasta
- Couscous
- Potatoes
- Quinoa
- Vegetables
Outside of your base, it’s just a matter of adding some of these items to the mix:
Ingredients I might add to my meal out on the trail:
- Olive Oil
- Cheese (Non-Powder Form)
- Nut Butter
- Hard Meats
Some ingredients are worth cooking and dehydrating yourself, and some are worth buying dehydrated already.
What I buy:
Milk, cheese & butter powders – Good luck trying to do these on your own. I purchase these ingredients online.
Vegetables can be rather expensive and time-consuming to cut and dehydrate vegetables.
I currently buy all of my vegetables in bulk, already cooked and dehydrated.
Harmony House seems to be the best option when evaluating price & quality.
Grow your own vegetables? You’re awesome! In that case, dehydrate your own goods.
Remember that most vegetables hold an insane amount of water & they shrink down to about 1/10 of their size & weight. A little bit of this stuff dried goes a long way.
I was a little put off by spending $50 on the Harmony House Backpacking Kit at first but have found it to be beyond worth it.
The kit provides enough vegetables for 50-100 meals—also some nice variation to the kit. You can also buy individual ingredients from the company.
Things I dehydrate:
Rice – You could go the minute-rice route and skip cooking & dehydrating all together.
I prefer cooking good brown rice and dehydrating it on my own.
Quinoa – I have found no good options for buying this stuff dehydrated. This is my favorite go-to base for all meals. The nutritional benefits of this superfood are off the charts.
Noodles – Can cook most noodles out on the trail without cooking or dehydrating them beforehand.
Couscous – No dehydrating required for couscous. This is a popular food source for hikers. It’s made of flour and is not a whole grain, so I avoid this one.
Potatoes – I’d recommend buying this stuff already dehydrated in flake or powder form.
Lentils – Easy to cook and dehydrate. The cost of this stuff already dehydrated isn’t worth it, in my opinion.
Beans – Opposite of the lentils. I have found that Santa Fe makes a really cheap, good dehydrated bean.
Meats – This one you have to be real careful with. Meat can spoil real easy. I personally only feel comfortable making beef jerky.
The best thing about dehydrating and putting together your own meals is the amount of creativity & customization you have at your fingertips.
Dehydrated Snacks

Dehydrating your own food can become addictive.
If you’re doing your meals this way, why not step up your snack game.
Fruits
Dehydrated fruits make for a delicious healthy snack.
You can dehydrate most fruits as long as they are cut into small pieces.
Some of my personal favorites:
- Bananas
- Kiwis
- Mangos
- Apples
- strawberries
Fruit Leather
I live next to an abandoned blueberry bog.
Every summer, I harvest a freezer full of berries & make an ample supply of fruit leather.
Fruit leather is made by pureeing fruit & water in a blender & then pouring the contents out onto the trays of your dehydrator.
I like to add raw honey, lemon juice, hemp seeds & Himalayan salt to the mix.
This is definitely another POWERHOUSE snack.
Beef Jerky
Another favorite of mine. If I can get a good deal on some bulk meat, I’ll make a few batches of this.
The only downfall to making giant batches of jerky…
It gets eaten up faster than anything else I dehydrate.
Favorite DIY Recipes
There are a few meals that I have eaten more times than I can count.
AND I still LOVE them.
Trail Taco Meal
This one is everybody’s favorite. This recipe packs about 1,000 calories and fills me up properly.
Once your meal is completely cooked, and you’re ready to eat it…
Throw a handful of corn chips or Fritos into the mix.
In a sandwich size ziplock bag, mix:
- 3 oz Instant Rice
- 3 oz Instant Beans
- 1 Tbs Cheese Powder
- 1 Tbs Butter Powder
- 1 Tbs Harmony House Vegetables
- 1 Tsp Taco Seasoning
- Salt & Pepper
Variations:
• I personally like to replace the instant rice with a combination of rice, lentils, and quinoa I dehydrated myself.
• You can double up the amount of cheese and butter for added calories & taste.
• Choose any vegetables that you find fit. My top picks for this one are green onions, peppers, & jalapeños.
• 1 Tsp of taco seasoning is a baseline; you can adjust this to your liking.
• The amount of every ingredient can be changed to your liking.
• If you’re making meals on this level, it’s best to take notes until you dial in your own perfect flavor combination and portion size.
Cooking Instructions:
• Pour contents of the bag into your pot.
• Add water until it’s about 1/4″ above food.
• You can adjust the amount of water to get the consistency you like best. (This takes a little bit of practice.)
• Fire up your stove about half blast.
• Stir contents occasionally as the water heats up.
• Turn off the stove at first signs of water boiling and give your meal one final stir.
• Put the lid back on your pot and DO NOT remove it for 10-15 minutes.
• Remove lid, throw a handful of corn chips on your meal & ENJOY.
These are the same cooking instructions for all of my DIY meals.
Check out more of my favorite DIY recipes.
Join the backpacking community 🙂
Emails are never shared. Unsubscribe at any time.
Disclosure: This page contains affiliate links. This adds no extra cost to you, but I may receive small commissions for purchases made via these links.
This helps me eat and keep the site running.
I really appreciate the support.
Happy Trails

PS: Leave a comment here if you have any questions, and I will be HAPPY to answer them:)
Our approach is usually a mix of both methods, and in this post we aim to outline our general backpacking food strategy and suggest some of our favorite meals. SPICES CONDIMENTS – Eating too much of the same thing over the course of a 5-day backpacking trip will probably drive you nuts. Small packets of salt, pepper, olive oil, hot sauce, and fast food condiment packets (mayo, mustard, relish, etc) can really elevate your backcountry grub. And if you want to get super fancy, you can even get a GSI Spice Missile to carry up to 6 spices for less than 2 oz.
Condiments are king. Appreciate the awesome comment. 🙂
Thanks for all of this and your videos too!! Looking forward to more!!
Thanks for the inspiring words.
Beyond appreciated!
Check out Heather’s Choice backpacking meals. Made in Alaska (while Good-To-Go is Made in Maine!) and they have paleo options. The Dark Chocolate Chili with Bison doesn’t have any beans in it! 😮
Hey Margaret,
That sounds awesome! Thanks a ton for the recommendation. 🙂
The coconut fat/nut butter combo … is that parts by weight or volume?
Hi Jay!
I go by volume. I usually just eyeball it.
Let me know what you think about it after you give it a try. 🙂
Happy Trails!
Amazing information – you should write a book!
Thanks so much, Caitlin.
I really appreciate that:) In the process of completing some more written guides that will be up on the site soon.
What up Iron! I agree with Caitlin bud, been watching a ton of gear vids, pct / jmt documentaries etc. on ytube and I always enjoy your content and the way you deliver it. Your content on both ytube and website always seems to be more helpful to me than most and I can’t turn it off. Keep up the good work!
Hey Ken! Thanks a ton, man. Have been feeling uninspired to create new work lately so this really helps. Happy trails my friend.
I like the “Tasty Bite” food packets. They have so many Thai or Indian meals and even cooked rice to go with them of various kinds. These are great, lightweight, hearty meals that can be mixed and eaten directly from the pouch it comes in (no dishes, except a spoon) and can be heated on a sunny car dashboard or even in a warm backpack. Rinse and fold pkt up to practically nothing and pack it out. No fuss, no muss!
Hello Maggie.
I have tried the meals you are speaking of & I can vouch for there tastiness:)
Water is the first or second ingredient in most of there meals.
That means there’s more water than anything else in the package…
I try to avoid carrying foods that have such a high water content.
Most of there meals weigh about 10 ounces and only provide about 300 calories.
For those reasons, I don’t find them to be an ideal choice for backpacking.
Thanks for commenting. Very much appreciated.
First off, great comprehensive guide! I’m inspired to start food prep for this season with a bunch of new ideas.
I’ve got to ask: how are the cheese and butter powders? I figure fresh cheese is so calorie dense that taking a block of aged gouda or sharp cheddar is worth the weight. Does it taste like ballpark nacho cheese or $1 mac & cheese?
Thanks a ton, Nick! Appreciate the feedback. Prepping food gets me STOKED for upcoming trips.
Real cheese is definitely the best taste and comfort wise. I always try to bring real cheese on my trips to snack on if I can. Always worth it in my opinion.
I’ve found that using real cheese in meals though makes cleaning out your pot much more difficult and not worth the time and effort overall (for me anyway). One of the only ingredients that really stick to your pot.
I can also add cheese and butter powder to my meals far ahead of time and not worry about them spoiling.
That said, I have found Anthony’s brand of powdered cheese to be very good. Similar to Annie’s Mac cheese powder…
$2 mac & cheese:)
I also LOVE the taste of the butter powder I mentioned in this article.
I find myself using it at home often and have even started putting in my coffee every day combined with my coconut milk powder for a full bulletproof effect.
Should definitely give the powders a shot if you’re on the fence.
Hope that helps.
Happy trails my friend!